
When you have successfully completed this section, you will have mastered the following:
This section outlines procedures that have been proven over time to be efficient and accurate in diagnosing problems in the lighting and wiring systems. In addition, there are also tips on remedying problems and avoiding trouble in the future.
There is a wide variety of problems that can cause vehicle lighting and wiring systems to fail. Following are two systematic approaches to troubleshooting lighting problems.
Total System Failure
If a trailer has a total system failure (no part of the system appears to be energized), the following are basic steps in diagnosing the problem:
Single Lamp Outage
If the trouble appears to be isolated to one lamp or lighting device:

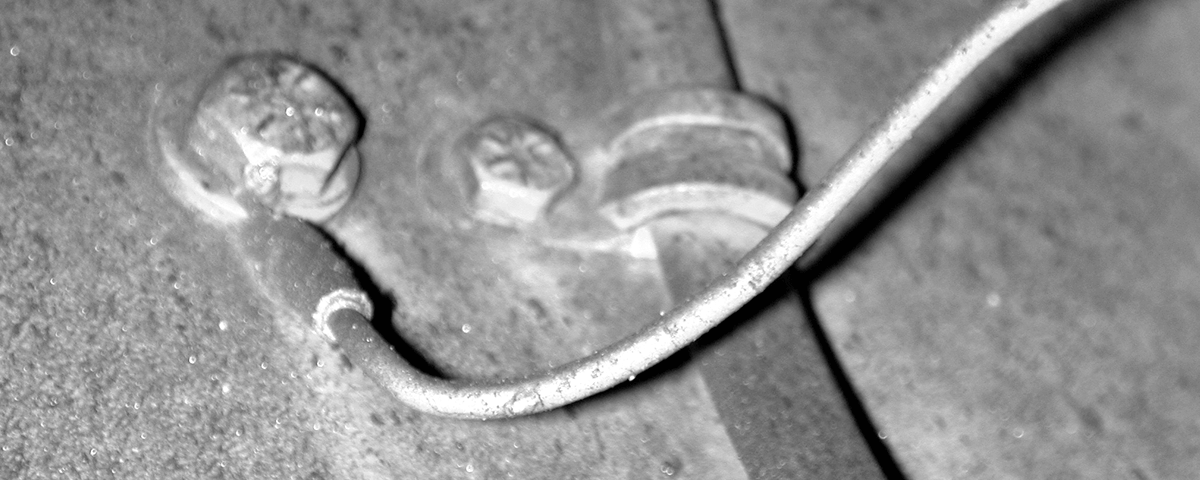
Believe it or not, this is a 7-way trailer con- nector. It has been so badly eaten away by corrosion that only one or two of the lugs are still visible. The result of this kind of corrosion will always be total system failure.
Assuring Good Connections
When working on wiring and the harnesses, jumpers, pigtails and other connectors must be disconnected. Care should be taken to keep them dry and free of contamination. During reassembly, completely clean the components and carefully coat the connectors with Grote Corrosion Preventive Sealant to prevent moisture and other contaminants from entering.
NOTE: Avoid using sodium-based anti-corrosion coatings or greases. Sodium will emulsify (turn soapy) and dissolve if it is exposed to moisture. Sodium will also increase the chance of corrosion.
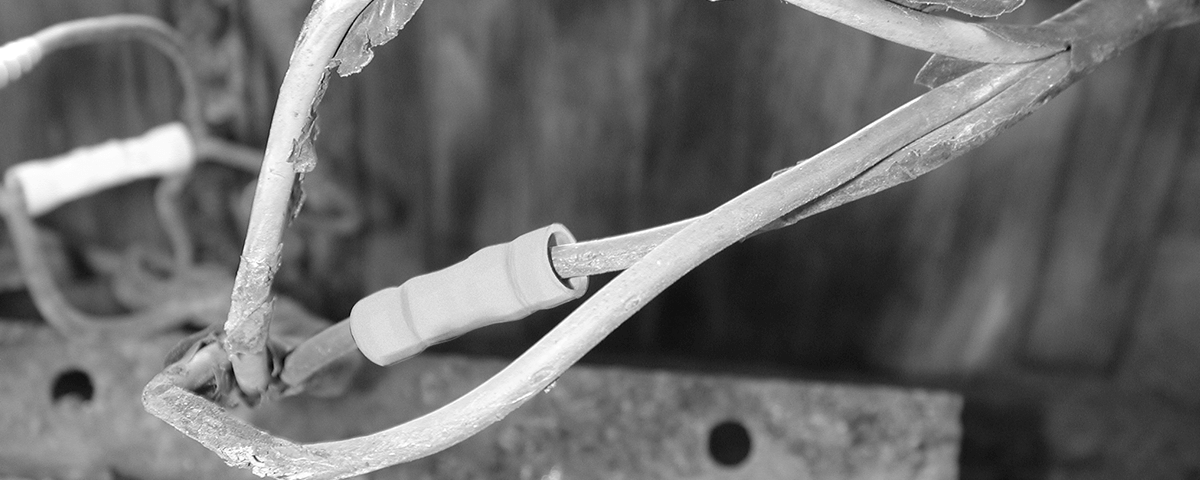
Some other practices will also help to assure good connections. For example, take care to fashion secure junctions even when making temporary splices. Use a heat shrinkable butt connector which adds strength to the joint and helps exclude moisture and contaminants.
If soldering a connection, use resin core solder only. Never use acid core solder, since it can cause corrosion. As with other types of connectors, always use shrink tubing to protect the solder joint.
Do not use electrical tape alone to secure and seal connections. Over a relatively short period of time, tape will relax and allow moisture and corrosion to enter (and will hold contaminants as it relaxes, accelerating the rate of damage).

Do not use electrical tape alone to secure and seal connections.
Take Care When Using Testers
It's tempting to peel away a section of the insulation on a wire or use the sharp end of a tester probe to penetrate the plastic coating in order to reach the copper wire inside.
Although this approach may be the fastest way to test a specific circuit, the damage done to the integrity of the insulation can create many problems in the future.
For example, moisture and corrosives entering the wire at the cut or puncture can "wick" or travel inside the insulation and reach connection.
Over time, that buildup of contaminants is enough to eat into other components and cause the connections to fail.
Once started, the wicking action can run throughout the entire wiring system and potentially corrode every connection in the system.
The correct testing method is to utilize termination points along the main and rear sill harnesses, jumpers, pigtails and other wiring devices, as well as the lamps themselves. This approach will provide timely results and protect the wiring from additional damage.
Replacing Wire & Cable
One of the most important things to bear in mind is that replacement wire should be equal to or heavier than the original equipment. Using lighter gauge wire without reducing the current draw could result in damaging heat due to the higher resistance. Another result may be diminished light output, as the current is "choked" because of the reduced capacity of the wire.
It is essential to avoid the use of splices whenever possible. Splices naturally become weak spots in the wiring system. Even the best of them can pull apart and offer another potential opening for moisture and corrosion. As indicated above, necessary splices should be reinforced and sealed with the appropriate heat shrink tubing as a precaution. Be careful to use the proper sized crimping tool to ensure that the crimp is sound and secure.
Other components in the system should be discarded and replaced when damaged or worn. Replace lamp assemblies, pigtails, jumpers or other components that malfunction and could contaminate other parts of the system.
Avoid the use of splices whenever possible.
Correcting Voltage Problems
"Under-voltage" has a number of causes. Poor connections are the major cause of under-voltage. Undersized replacement wire can be the culprit in some cases. Any under voltage or dim light problem should be tracked down and solved before it progresses to a complete system failure. Diagnose the underlying problem, don't simply raise the voltage and consider the problem solved.
The same is true of over-voltage, which can damage electrical system components. For example, operating an incandescent lamp at as little as five percent over design voltage reduces the life of the lamp by 44%. Operating at 10% over can reduce lamp life by as much as 68%.
A good clue that the electrical system is being subjected to over-voltage is a pattern of repeated lamp failures with "no cause." That is especially true when the failures involve headlamps and dash lighting.
Ideally, system voltage should be adjusted to meet minimum acceptable levels for proper operation. In practical terms, that would suggest that the ideal voltage going into the nose of the trailer should be 12.5 volts, a recommended TMC procedure.
Improper Grounding
A proper ground is required in order for the system to operate. Even with the appropriate voltage supplied to a lamp, for example, without a proper ground, the lamp will not operate. A loose or disconnected ground wire is often the cause of lamp failure when harnesses and other components are in perfect condition and power supplied to the lamp is at the optimum level. That's especially true where a chassis ground is used.
Always check to make certain that the ground connections are secure and clean. When lamps are grounded through the lamp housing, make certain that there is a tight, metal-to-metal connection that is clean and not corroded. If a lamp is grounded with a separate ground wire to the chassis, use a ring terminal instead of a spade or hook terminal to protect against accidental disconnection.
Since dirt and corrosion are ever-present enemies, care should be taken to make sure that a proper ground is securely made.
The Proper Lamp For Each Location
It's very important to make certain when replacing lamps that a comparable lamp is used. Replacing dome lamps with backup lamps, for instance, is a common but dangerous practice. Backup lamps usually have high candlepower bulbs that generates high temperatures. Under certain conditions, this excessive heat can cause interior fires that can destroy wiring, lighting devices or the entire vehicle.
Replacing a license lamp with a utility lamp is not allowed, since it doesn't meet FMVSS 108 requirements.
Heat's Effect On Lamps
Typically, lamps will last longer if they run cooler. Elevated temperatures represent some of the most damaging operating conditions, especially for incandescent lamps.
The most common cause of heat related failures is lack of air movement. Leaving lamps on when the truck is parked against a dock, especially in hot weather, can severely limit service life by causing the temperature in and around the lights to jump. Melted lenses are a sign that the vehicle has been left with the lights on while up against the dock.
Another cause of increased operating temperatures is dirty lenses. A buildup of mud and grime adds a layer of "insulation" to the lens creating higher temperatures
inside. Cleaning the lenses also improves overall safety by making the vehicle easier to be seen.
Cleaning Lenses
Care should be taken to choose only cleaning agents that are compatible with the lens and housing material, especially polycarbonate parts. Polycarbonate is 50 times stronger than acrylic, but doesn’t stand up to chemicals and solvents well.
Although the parts are tough and resist wear and impact breakage, use of cleaning agents that are not compatible may cause softening, crazing, or cracking. This is particularly true in situations where lenses and mounting bases are mounted on an uneven surface. If a lens or housing appears to be partially melted, it’s possible that solvents have attacked it. This type of damage will also show up as a surface that feels rough to the touch.
The chart below shows a selection of cleaning agents that are compatible with polycarbonate (and a group of agents which are not). If a cleaner is not represented as acceptable on the chart, do not use it. Choose one of those shown as compatible.
COMPATIBLE
NOT COMPATIBLE
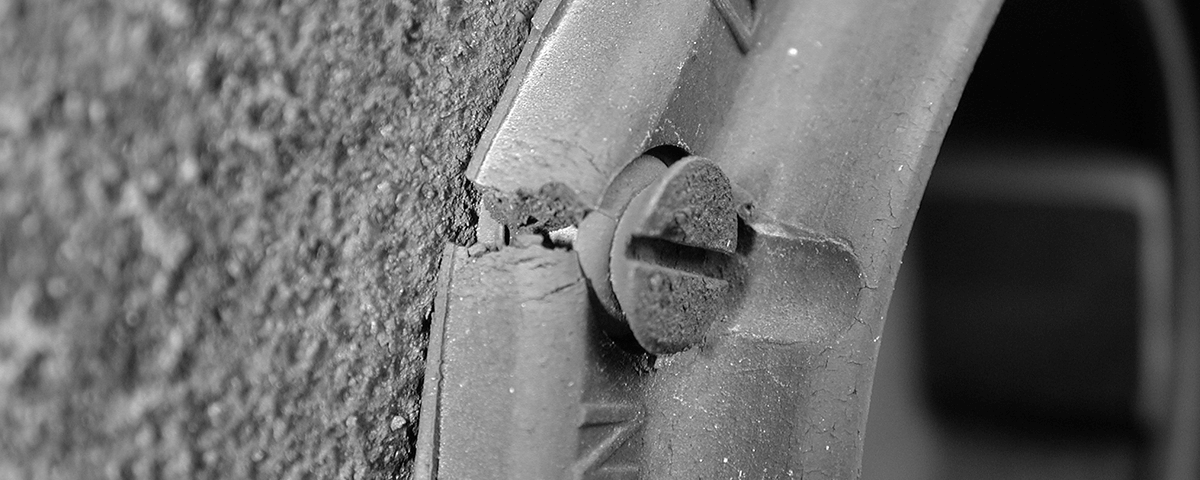
Proper Lamp Mounting
An overall guideline is to avoid over-tightening mounting screws. Tighten until screws are snug. A marker lamp will typically be tightened in the 8 to 20 inch lbs. range. Avoid any more than 20 or there is risk of distortion, cracking, breaking or causing the lens to pop off.
Always check to make certain that the pigtail or jumper is not positioned so that it prevents the housing from seating properly and mounting flush with the surface. Improperly mounted lighting devices will have a shorter service life because mis-mounting will allow water and other contaminants to enter the housing from behind.
Devices marked with "TOP," should always be mounted with that designation up when installing the unit. Failure to do so will result in the shock mount being installed with the wrong orientation. The result can be as much as 25% shorter lamp life. In addition, the mis-oriented lamp may fail to provide the correct light pattern and will lack the designed visibility.
Avoid overtightening screws protect against distortion, cracking, breaking or causing the lens to pop off.
Use the self assessment below to gauge your understanding of this section. Place your answer in the box and then check your answer by clicking on the "show answer" link.
Or, you can skip the assessment.
Instructions:
Read the question.
Place your answer in the box.
Example:
True or False:
You should read the questions and then type your answer into the box.
show answer
True!
Begin:
1. What three general areas should be checked if there is a total trailer system failure indicated?
show answer
a) Nose box, main harness and rear sill
2. True or False: If just one lamp is not working, the best approach is to replace it and move on.
show answer
False
3. True or False: Sodium based anti-corrosion coatings are superior to other types because they emulsify when exposed to moisture.
show answer
False
4. For electrical work, the best solder is:
show answer
a) Resin core
5. Electrical tape:
show answer
a) Relaxes and lets contaminates in to the connection or splice.
6. True or False: Wicking takes place when water travels along the outside of a wire’s insulation.
show answer
False
7. Increasing the current level in a circuit means:
show answer
d) All of the above
8. True or False: Using splices in a circuit is preferable to single piece of wire because it’s easier to isolate a problem on that circuit.
show answer
False
9. True or False: It’s very important to make certain when replacing lamps that a comparable lamp is used.
show answer
True
10. True or False: With dim lights, the approach is to adjust the voltage upward until the lights appear normal during the daylight hours.
show answer
False
11. At 5% above design voltage, the lamp life is shortened by approximately:
show answer
a) 44%
12. Normal voltage at the nose of the trailer should be:
show answer
b) 12.5 volts
13. True or False: In order to operate correctly lamps must have a ground even though the correct voltage is supplied.
show answer
True
14. A chassis ground uses ____ as a ground.
show answer
b) Connection to the vehicle structure
15. True or False: Corrosion at the ground connection helps make the connection more efficient.
show answer
False
16. True or False: Polycarbonate parts are impervious to cleaning products
show answer
False
17. True or False: Replacing a dome lamp with a backup lamp can be dangerous because of the high heat out put of the backup lamp.
show answer
True
18. Lamps will last longer if:
show answer
a) They run cooler
19. Melted lenses are a sign that:
show answer
b) The lights were left on with the trailer against the dock
20. True or False: A buildup of mud and dust adds “insulation” to the front of a lamp raising the temperature.
show answer
True
21. To avoid over tightening the screws when installing a new lamp, tighten them to:
show answer
b) 10 inch pounds
22. True or False: Failure to mount a lamp marked with the word “Top” with the correct orientation can result in as much as 25% shorter lamp life.
show answer
True